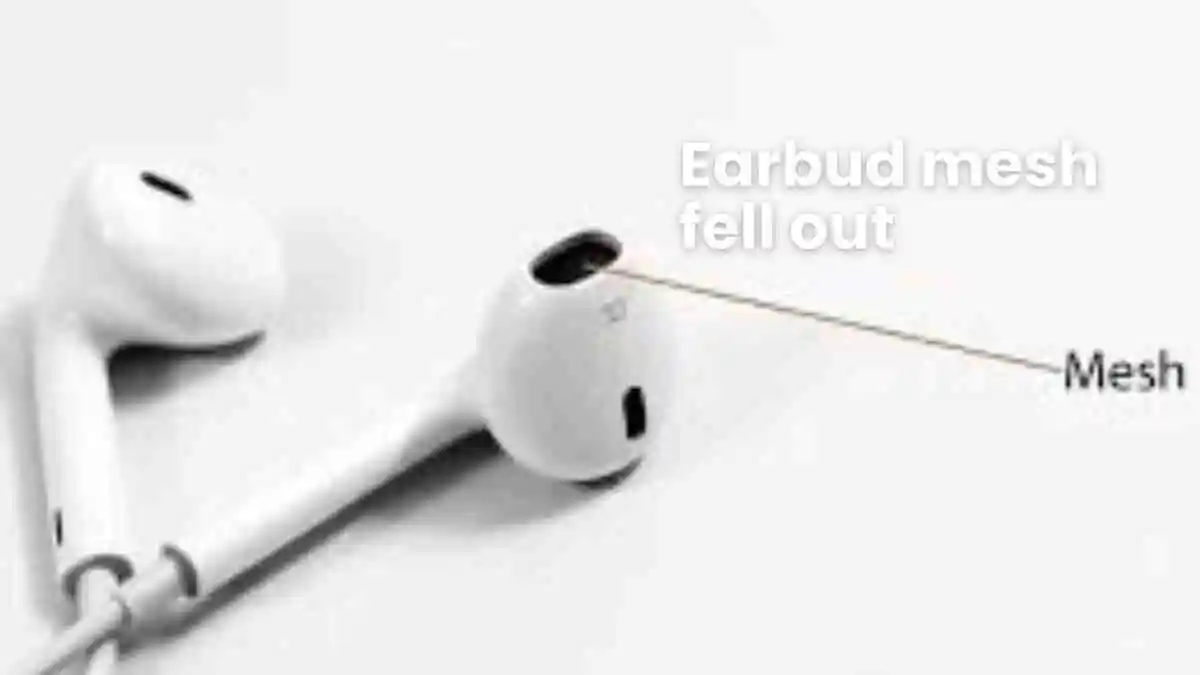
Earbuds have become an integral part of our daily lives, providing us with immersive audio experiences on the go. However, a common issue that many users encounter is the mesh or grill on earbuds falling out.
This occurrence can be frustrating and concerning, but fear not - this article delves into the causes behind this problem and offers comprehensive solutions to fix earbud mesh fell out without compromising the sound quality.
Why Earbud Mesh Fell Out?
Understanding why the mesh on earbuds falls out requires a closer look at their design and usage.
The mesh is generally a protective layer that shields the internal components of the earbud, such as the driver and electronics, from debris and moisture.
Here are some common causes of mesh detachment:
-
Wear and Tear: Over time, regular usage can lead to the gradual deterioration of the adhesive that holds the mesh in place.
Constant contact with skin oils, sweat, and environmental factors can weaken the bond, resulting in the mesh becoming loose or falling out altogether.
-
Moisture and Humidity: Excessive exposure to moisture, whether from sweat during workouts or humid weather conditions, can weaken the adhesive and cause the mesh to dislodge.
Moisture can seep into the adhesive, making it less effective over time.
-
Physical Impact: Accidental drops or impacts can jostle the components within the earbud, including the mesh.
Sudden force can weaken the adhesive or directly dislodge the mesh.
-
Low-Quality Adhesive: In some cases, manufacturers may use low-quality adhesive that fails to withstand regular usage and environmental factors.
This can lead to the mesh becoming detached sooner than expected.
-
Poor Design and Manufacturing: Earbuds with suboptimal design and manufacturing practices may have weaker adhesion methods, making them prone to mesh detachment.

Solutions: Fixing the Issue Without Compromising Sound Quality
While the sight of a detached mesh might be disheartening, rest assured that there are effective solutions available to fix the issue without impacting the audio quality.
Keep your earbuds clean:
Sometimes, stuff like dirt and earwax can stick to the mesh and make it loose. Clean your earbuds regularly to keep them free from this stuff.
Keep your earbuds dry:
If your earbuds get wet, the mesh might get loose or come off. Don’t use them in water or while you’re in the shower. If they do get wet, make sure to dry them properly.
DIY Adhesive Solution:
For those whose earbuds are out of warranty, a simple DIY solution involves reattaching the mesh using a high-quality adhesive. It’s crucial to use an adhesive that is safe for electronics and won’t affect sound quality.
Epoxy or cyanoacrylate (super glue) designed for electronics can be carefully applied around the edges of the mesh and pressed into place. Ensure that no excess adhesive seeps through the mesh, as this could affect audio quality.
Mesh Replacement Kits:
Some manufacturers or third-party sellers offer mesh replacement kits. These kits usually come with replacement mesh and the necessary adhesive. Follow the provided instructions carefully to ensure proper installation.
Protective Cases:
Using a protective case for your earbuds can help shield them from physical impacts and moisture, reducing the likelihood of the mesh detaching.
Regular Cleaning and Maintenance:
Cleaning your earbuds regularly can prevent the buildup of dirt and grime that could weaken the adhesive.
Use a soft, damp cloth to gently wipe the earbuds and mesh. Avoid using harsh chemicals that might damage the components.
Avoid Moisture Exposure:
Minimize exposing your earbuds to excessive moisture. Remove them during intense workouts or activities that might lead to excessive sweating.
Gentle Handling:
Handle your earbuds with care. Avoid dropping them and store them in a protective case when not in use.

Preserving Sound Quality:
A common concern when fixing the mesh is whether the sound quality will be affected.
While there is a possibility of subtle changes due to the altered airflow caused by the adhesive, following the steps mentioned above can help minimize any negative impact:
- Use adhesives specifically designed for electronics to prevent interference with sound transmission.
- Apply adhesive sparingly to avoid blocking sound ports or altering airflow.
- Follow manufacturer instructions for mesh replacement kits, as they are designed to ensure optimal audio performance.
How to Clean Earbud Mesh Carefully to Prevent Falling Out:
Maintaining the cleanliness of your earbud mesh is essential not only for hygiene reasons but also to prevent potential issues like the mesh falling out.
Cleaning the mesh carefully will help you maintain optimal sound quality and prolong the life of your earbuds.
Here’s a step-by-step guide on how to clean your earbud mesh without risking detachment:
Materials You’ll Need:
- Soft, lint-free cloth or microfiber cloth
- Cotton swabs
- Isopropyl alcohol (at least 70% concentration)
- Toothbrush with soft bristles
Step 1: Remove the Ear Tips Gently remove the ear tips from your earbuds. This will give you better access to the mesh and prevent any accidental damage to the tips.
Step 2: Turn Off and Disconnect Turn off your earbuds and disconnect them from any audio source or charging device. Safety precautions are essential when cleaning electronic devices.
Step 3: Wipe Away Surface Dirt Use a soft, lint-free cloth or a microfiber cloth to gently wipe away any surface dirt or debris from the mesh.
Gently dab the cloth over the mesh instead of rubbing, as excessive friction could damage the mesh.
Step 4: Clean Mesh Crevices Dip a cotton swab in isopropyl alcohol and gently clean the crevices around the mesh. Make sure the cotton swab is damp, not dripping wet.
Carefully swipe around the edges of the mesh to remove accumulated dirt or grime.
Step 5: Brush Away Debris Take a toothbrush with soft bristles and gently brush the mesh area. This will help dislodge any particles that might be stuck in the mesh.
Use light, sweeping motions to avoid putting undue pressure on the mesh.
Step 6: Avoid Direct Contact with Mesh It’s important to avoid directly touching the mesh with your fingers during cleaning. The oils and dirt from your fingers could transfer onto the mesh, potentially affecting its adhesive over time.
Step 7: Allow Drying Time After cleaning, allow your earbuds to air dry for a few minutes. Make sure they are completely dry before reattaching the ear tips and using them.
Step 8: Reattach Ear Tips Gently reattach the ear tips to your earbuds. Ensure they are properly aligned and securely attached.
Step 9: Power On and Test Power on your earbuds and test their functionality to ensure they are working correctly. Listen to a variety of audio tracks to make sure there are no issues with sound quality.
Conclusion:
The detachment of the mesh on earbuds can be a vexing issue, but it’s not insurmountable.
Understanding the causes behind this problem and adopting the right solutions can help you restore your earbuds' functionality without compromising sound quality.
Whether through a DIY adhesive solution or utilizing mesh replacement kits, taking proactive measures to prevent mesh detachment and caring for your earbuds can extend their lifespan and ensure your continued enjoyment of your favorite tunes or podcasts.